Introduction
It is generally accepted that leaking hatch covers are a principal cause of dry cargo wetting. Hatches leak for a variety of reasons, but mainly because of poor maintenance or failure to close them properly. Leaking or badly maintained hatch covers can lead to more serious consequences than wet cargo- flooding accelerated corrosion or even loss of the ship.
A watertight hatch cover is a cover designed to prevent the passage of water in either direction under a head of water for which the surrounding structure is designed. A weathertight cover is a cover designed to prevent the passage of water into the ship in any sea condition. Hatch covers are constructed to be weathertight, which means that, in any transient condition, water will not penetrate into the ship through the covers.
However, it is apparent that minor leakage into a cargo hold during a hatch cover test is often erroneously considered to be within a weathertight standard in practice, no leakage is the requirement. Your vessel will also carry oil and hence requirements are more stringent with respect to water tightness. Many mariners think hatches are robust, monolithic structures, thereby failing to appreciate the small tolerances on housing and gasket compression.
For example, a 4 mm wear on the steel-to-steel contact pads is sufficient to damage rubber sealing gaskets beyond repair; 5mm sag along the length of the gasket can cause a large gap between the compression bar and gasket.
It is better to think of the hatches as complex, finely –made structures, to be handled with care. It is our aim here to explain the key issues of hatch cover security and to achieve pro-active maintenance. It is crucial for safety at sea and protection of the environment to maintain hatch cover water tightness and strength. Please see the Appendix 2 and 3 for checklists on hatch maintenance and PMS.
Example Description of Hatch Covers
| Manufacturer | SEOHAE MARINE SYSTEMS |
| Complies With | ICLL AND IACS URS21 [REV.4] |
| Operational Parameters | CONSTRAINTS |
| Max Heel | +/-3 DEGREES |
| Max Trim | +/- 2 DEGREES [ abt 5.5 mtrs] |
| Material | MILD STEEL 50% AND GRADE 36 HIGH TENSILE 50% |
Operation
Each hatch cover is operated by 1 hydraulic motor via rack and pinion driving system installed in the middle of the port side. All hatches roll open to the port side. The control stands are located at the aft transverse coamings between the hatches.
Nominal Hatch Dimensions
1F 11,400 X 17,100 /13280 mm
The other 9 hatches are of equal dimensions: 17,100 x 19000 mm.
Wheels
Wheels are made of high tensile steel material and the forward hatch wheels are provided with rail flanges whilst the aft wheels do not have these rail flanges in order allow for a degree of free movement.
Hatch Packing
Weather Tightness: Solid Type Packing [NBR]
The rubber packing’s are installed in retaining channels made from hot rolled flat bar.
Compression Bar
Is made of stainless steel with round top flat bar [ sus 304] on hatch coaming top.
Weights
| Each Hatch Cover | ABOUT 73 MT |
| Hardware | ABOUT 6 MT |
| Additional Hardware | ABOUT 8 MT |
| Total Approx Weight of Hatch Cover | ∞ 75MT |
The Cargo Cranes have a SWL of 30MT.
Hatch Covers and their Function
The purpose and function of a hatch cover and its coaming is to prevent ingress of water into a cargo hold after a large opening has been cut in the deck for cargo access. Hatch covers are a movable structure designed to a weathertight standard.
Hatch Cover Construction
Typically hatch covers are lightweight steel grillages. Modern design methods using finite element technology enable more efficient material distribution which results in lighter (thinner) structures. Construction from high tensile steel results in even thinner plate being used. For this reason these lightweight structures must be ‘handled with care’. Prevention of corrosion is essential-safety margins are finite.
Hatch Cover Function
Hatch covers provide a primary structural and watertight barrier to prevent water ingress into cargo hold. Rigorous inspection, regular maintenance and prompt repair of damaged covers, securings and support are essential to maintain fitness for purpose and, in particular
- To maintain sufficient strength to resist green seas landing on hatches in extreme weather
- To maintain a barrier against ingress of water during normal seagoing weather conditions
Failure to maintain hatch covers correctly can lead to physical loss of a cover in extreme weather and hold flooding and possible foundering. Minor leakage can cause cargo damage and, if over a prolonged period , damage to the ship ‘s internal structure . Long-term structural decline can lead to structural collapse and total loss.
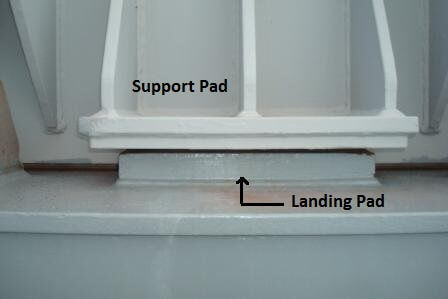
Fig 1: Support Pads and Landing Pads Making Steel to Steel Contact
Basic Procedures
Always Do
- Carry out regular inspections of the hatch covers, beams and coamings to identify
- General levels of corrosion
- Localized corrosion at welds
- Cracks in joints and weld metal
- Any permanent distortion of plating and stiffeners.
- If any cracks detected in main structural joints or local heavy buckling then inform office immediately
- Be particularly vigilant after heavy weather.
- Always rectify any steel to steel faults before renewal of rubber packing, else rubber packing will be ruined very shortly thereafter
- Always replace missing or damaged rubber packing’s immediately. [ THE MINIMUM LENGTH OF REPLACED PACKING SHOULD BE ONE METRE ]
- Keep cleats in good serviceable condition and correctly adjusted.
- Keep cleats, and wheels well greased
- Test hydraulic oil quarterly
- Ensure oil levels are correct
- Remember that continuing and regular maintenance of hatch covers and packing’s is more effective and hence less expensive than sporadic inspection and major repairs.
Always
- Never treat temporary repairs as if these were permanent. The strength of the hatch cover and ultimately the ship will depend on the quality of repairs . REMEMBER YOUR SHIP WILL ALSO CARRY OIL HENCE TAKE GREAT CARE OVER REPAIRS.
- Never ignore serious corrosion, cracks or distortions in the covers and supports/coamings.
- Never APPLY PETROLEUM BASED GREASE OR PAINT ON RUBBER PACKING
- Never leave cleats unfastened when proceeding to sea
- Never open hatch covers at sea unless absolutely essential or keep them unattended if opened. Ensure the gains outweigh the risks. [ Hatch covers weigh about 78 mt each]
Some Misconceptions about Hatch Covers
- HATCH COVERS ARE NON LOAD BEARING
Hatch covers can be subjected to very high pressure loadings during heavy weather. This heavy load induces significant stresses at the component plating, girders and stiffeners.
- LEAKAGE IS AN INCONVENIENCE RESULTING IN CARGO WETTING
Leakage where unchecked causes severe flooding and endangers the ship and its personnel when v/l in dry mode and when carrying oil, it will result in oil and gas leaks/pollution etc.
- RENEWAL OF RUBBER SEAL/WILL KEEP THE HATCH WATER/OIL TIGHT
Worn rubber is usually the result of worn steel to steel contact surfaces or a deformed structure. Rubber renewal alone is futile unless the steel to steel contact surface is repaired.
- THE HATCH COVER SIDE PLATE WHEN CLOSED SHOULD REST ON THE COAMING TOP.
If the weight of the hatch is sufficient to cause distortion on its side plate [ hatch skirt] then landing pads are fitted to the panel to transfer the weight across the coaming top which is so on your vessel.
- HATCH COVERS WILL ALWAYS LEAK IN HEAVY WEATHER
Hatch covers are designed to withstand the rigours of the sea. Provided the cleats are correctly adjusted, hatch gaskets are in good condition and the construction material sound then hatch covers should not leak regardless of the weather.
- SCREWING CLEATS DOWN HARD WILL ENSURE WEATHER TIGHTNESS
No amount of tightening of cleats beyond their correct position will improve hatch cover weather tightness. The hatch covers are factory tested without engaging cleats. The weight of the hatch is sufficient to create the required gasket compression. [ Hatch covers need to be cleated for protection against excessive movement]
- USAGE OF HATCH COVER TAPES WILL ENSURE WATER TIGHTNESS
The use of sealant tape gives a false sense of security. Hatch Cover tape is short term temporary measure that can be used to stop water/oil from entering/escaping side joints. In bad weather sealing tape can be washed off and when used with a certain amount of success will only result in the hatch being weather tight and not oil/water tight.
Leakage Problems
Most leakage problems occur because of poor maintenance. Although robust. Hatch covers will leak if compression surfaces are not aligned correctly, or gaskets damaged or worn,and if there is a permanent overall distortion of the covers.
Maintenance of the Hatch Cover Structure
Corrosion reduces the strength of a hatch cover. Reduced strength gives rise to increased deflection and possible loss of the steel to steel contact when a hatch cover is loaded due to green seas. If corrosion is advanced it can weaken a hatch cover to the point when moderate seas loading causes permanent deformation and permanent loss of the steel to steel contact.
Maintenance of the Steel to Steel contact surfaces
Hatch covers are defined to make steel to steel contact between a defined part of the hatch cover and coaming when closed. This steel to steel contact determines the amount of compression between the hatch gasket and compression bar. Contact might be nothing more than the hatch skirt sitting on the metal landing pads. (See Fig 1)
When the hatch landing pad is worn, pressure on the hatch gasket (rubber packing) increases. If this wear is greater than 4mm, increased pressure on the gasket will cause damage . Landing pad repair is essential.
Maintenance of Rubber Packing – Aged Gaskets
Ozone in the atmosphere accelerates ageing of rubber. If it becomes hard and loses elasticity, the entire length the of aged gasket should be replaced. Place spare rubber packings in a well ventilated store within the accommodation.
Maintenance of Landing Pads
The size and dimensions of a landing pad are dependent on the size and weight of the hatch cover. Landing pads are normally located adjacent to cleats. The pads are fitted to the top of the coaming and to the side of the hatch panel. Landing pads should always be repaired to their original design height
Leak Detection Tests
The two most common leak detection tests are:
- Water Hose Leak Detection Test.
- Ultrasonic Test. Ultrasonic testing is the preferred method because areas of inadequate hatch sealing are accurately located.
- Chalk Test. Chalk testing (another hatch test) gives only an indication of poor compression and potential leaks. Chalk testing is not a leak detection test. Light testing is also effective but is potentially dangerous because personnel are in a closed, dark hold looking for light infiltration. If hatches are found to leak during a test, make the necessary repairs , then test again.
Water Hose Leak Detection Test
Water hose test is used to determine weather tightness of hatch covers. If correctly performed, hose testing will show hatch joints that leak.
The general procedure for hose testing is to apply a powerful jet of water from a 20-50 mm diameter hose fitted with a 12mm diameter nozzle held at a distance of 1-1.5meters from a hatch joint at a speed of 1 metre every 2 seconds.
The drawback of hose testing are :
- The hold needs to be empty
- It cannot be performed in sub-zero conditions;
- It requires the deck scupper drains to be open (potentially causing pollution);
- The test cannot pinpoint leaks accurately;
- Two people are needed to supervise the test.
Care should be taken to avoid excessive nozzle back-pressure.
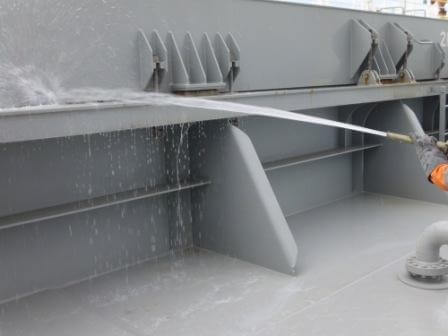
Fig -2 Leak Test By Water
Ultrasonic Leak Detection Test
Ultrasonic leak detection is a viable alternative to the hose test for testing hatch covers, access doors and access hatches for weathertightness, as it accurately locates potential points of leakage . This test should only be carried out using class approved equipment and approved test procedures.
The test involves placing (with hatches closed and secure ) an electric signal generator inside the cargo hold. A sensor is then passed around the outside of all compression joints . Readings taken by the sensor indicate points of low compression or potential points of leakage.
Ultrasonic testing overcomes the majority of limitations associated with hose testing and can be carried out when holds are loaded.
The drawbacks of ultrasonic leak detection tests are:
- The equipment requires an experienced and specialist operator to interpret the readings;
- The equipment requires regular calibration;
- The equipment is not normally part of the ship’s equipment.
Chalk Testing
When performing a chalk test. The top edge of every compression bar is covered with chalk.
Hatches are then fully closed and reopened . The rubber packing is examined for a chalk mark, which should be run continuously along the packings centre. Gaps in the chalk mark indicate lack of compression. Chalk testing merely indicates the if hatch is aligned and compression achieved . It will show whether compression bar is adequate and therefore it is not a test for weathertightness.
Monitoring and Inspection
Hatch covers and their fittings should be inspected at the end of every cargo voyage and all findings recorded. The appended checklist must be used.
Inspections should be planned and held in time for repairs to be completed before the next cargo voyage Hatch covers and their fittings should be inspected at the end of every cargo voyage and all findings recorded. The appended checklist no.2 must be used.
Inspections should be planned and held in time for repairs to be completed before the next cargo voyage
Inspect and Check
- Covers and coamings should be well painted and free from significant corrosion, cracks and distortion.
- During an inspection look for:
- Holes and permanent distortion in the plating
- Distortion of beams and/or stiffeners on the underside of the top plate.
- Corrosion around welded connections of beams or stiffeners
- Cracking of connecting joints and welds
- Hatch movement . This should be smooth . If violent movement is observed, investigate and remove the cause.
- Hydraulic system for leakage
- Check for physical damage, corrosion and tension when locked.
Steel Landing Pads
Check for Wear: Worn landing pads will damage hatch gaskets and cause hatch leakage. Any deviation is an indication of landing pad wear or permanent distortion. If noted, investigate fully and repair immediately.
End Stop Pads
Check for Damage: End stop pads prevent hatches from overrunning when hatches are fully open or closed. Look for physical damage.
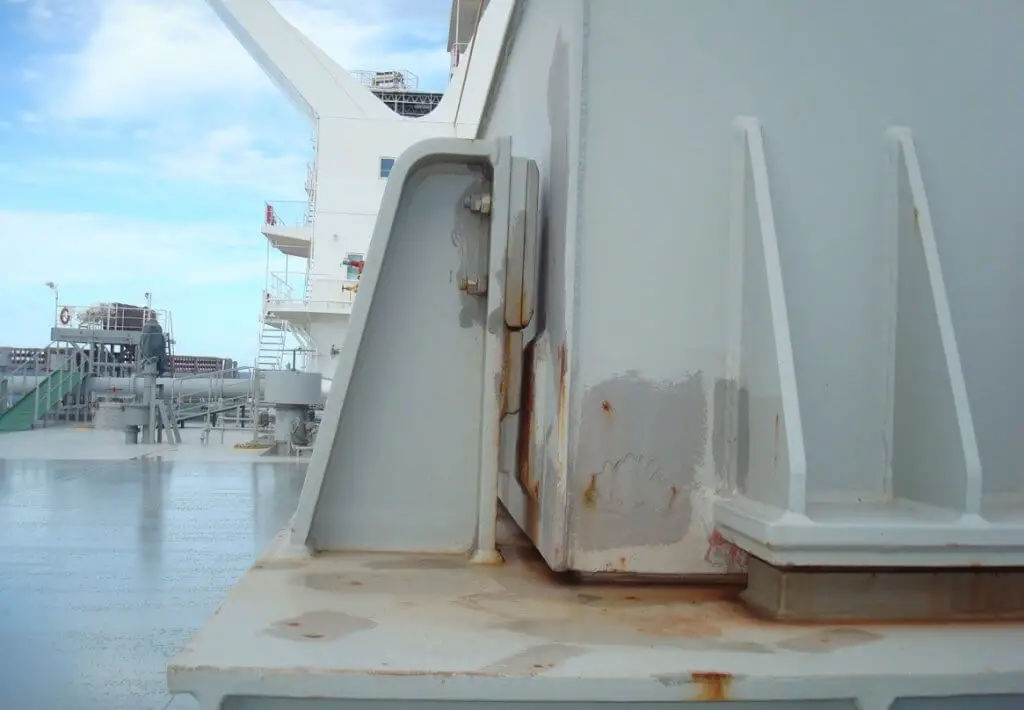
Fig-3 End Stop Pad at Closed Position.
Hatch Wheels
Check for Alignment: Hatch wheels should align squarely with the track way. If the wheel axle is worn the wheel will loll. If it does, repair immediately.
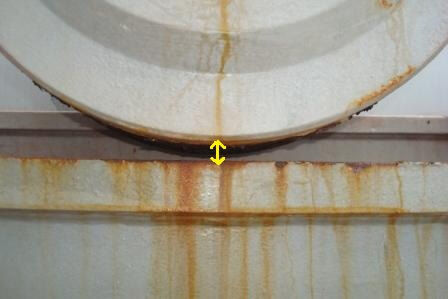
Fig:4 Note Wheel Not Resting On Trackway- Correct example of Hatch Cover Housed Properly – 10 mm Clearance
Rubber Seals
Check For Elasticity, Mechanical Damage And Permanent Deformation: When hatches are opened, rubber seals should regain their original shape. If they do not , check for ageing. Permanent deformation should not exceed 75% of the design compression.
Locking Devices
Check That They Operate: Locking devices are often pins or hooks, these should engage when the hatch is open. Look for physical damage, rusting and seizure.
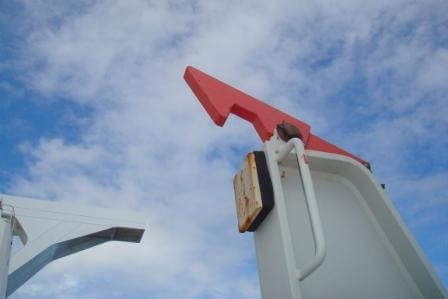
Fig-5 Locking Hook And Stop Pad When Hatch Fully Opened
Spares
Rubber packing and adhesive has a limited shelf life, so check the date stamp and discard if beyond the use –by date. There should be sufficient spare parts (cleats, wedges and gaskets ) to complete planned routine maintenance. Place spare rubber packing’s in a well ventilated store within the accommodation.
Maintenance and Repair
Poor maintenance of hatch covers causes leakage to cargo damage and represents a hazard to the ship and its crew . Although hatch covers are simple and durable , their sealing gaskets are easily damaged. The quality of sealing is affected by lack of alignment and poor gasket compression. When hatch covers are opened at the end of an ocean voyage, look for signs of leakage such as rust staining or drip marks.
Regular adjustment and repair, by ship’s staff, will reduce the overall cost of maintenance. Always keep a detailed record of maintenance. Take care during extensive hatch cover repair to avoid cover distortion.
Rubber Gaskets
Keep clean and free from grease and paint . If physically damaged , permanently set-in or aged, replace with minimum one metre lengths. Always follow the manufacturer’s instructions when renewing gaskets .
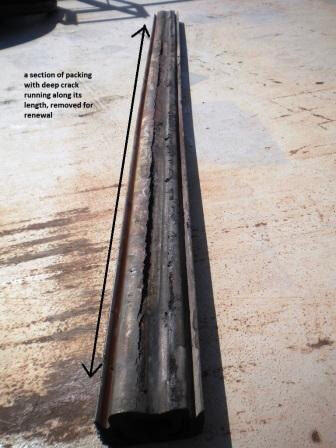
Fig -6 Example Of Damaged Rubber Gasket
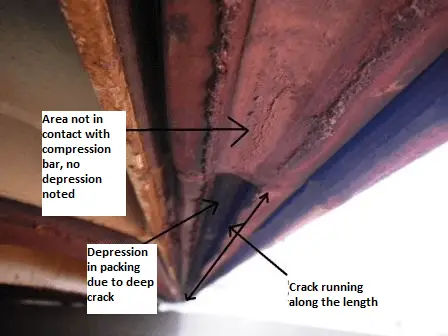
Fig -7 Another Example Of Damaged Rubber Gasket
Gasket Channels
If gasket channels are badly corroded, causing the hatch packing to hang loose, the packing should be removed and the channel repaired by welding new metal strips which should be painted before fitting new rubber. When conducting extensive structural repairs , remove the hatch covers to shore.
Hatch Cover Structure
Repair or replace any damaged, worn or defective hatch covers or coamings. Consult with the ship’s classification society before commencing repair. Paint new structure immediately.
Compression Bars
Effective sealing is only possible with a straight, undamaged and non-corroded compression bar. Ensure compression bar always kept free of corrosion [ it is made of stainless steel and may be lightly wire brushed] and strictly no painting. Compression bars which are not in this condition should be repaired or replaced , taking care to align the bars properly. Remember to carry out a chalk test to check alignment , both during and after repair.
Landing Pads
[See Fig 1] Hatch sealing is arranged by design to give the correct compression of the gasket when there is metal-to-metal contact on the hatch landing pad, If landing pads are reduced in height (check with manufacturer’s drawings) because of wear, repair is essential.
Hatch Wheel Trackways
[See Fig 4] Trackways can corrode. They are weakened by abrasive wear and tear. When weakened, trackways can distort and break, affecting hatch movement and alignment . Deterioration is visible to the naked eye . Repair by replacing the worn or damaged material with sufficient new material to restore strength. Always keep hatch wheel trackways clean and painted.
It is recommended that after every hatch securing the trackways are scrapped of old loose paint and rust and a fresh coat of paint applied. This will increase the longevity of a very important load bearing part of the hatch cover system.
Hatch Coamings
Look for cracks at coaming corners. If any are found, consult the office / ship’s classification society before commencing repairs in case the coaming needs to be reinforced.
Examine coaming support brackets for corrosion where they connect with the ship’s deck. Make sure coamings and their support brackets are painted.
Coamings can be damaged by cargo equipment during loading or discharge. Look out for damage and repair if found.
Hatch Cleats
It is important for compression washers to be adjusted correctly. A locking nut for adjusting compression is situated at the base of the cleat. The procedure to alter compression is as follows:
- Close hatch and secure for sea;
- Place the cam of the cleat in the hatch socket as if to lock it, but leave it unlocked (the cam should move freely and fit snugly in its housing);
- Adjust the locking nut until the compression washer touches the underside of the hatch coaming or its steel washer;
- Turn the locking nut one full turn to achieve the desired tension;
- Do not over-tighten ;
- Protect the thread on completion.
When closing and securing a hatch for sea passage , check the tension in side cleats. Cleats should never be adjusted in isolation , adjust all cleats diagonally opposite similar to tightening a flange. We advise the numbering /stenciling of cleats on opposite sides such that the crew can tighten them symmetrically.
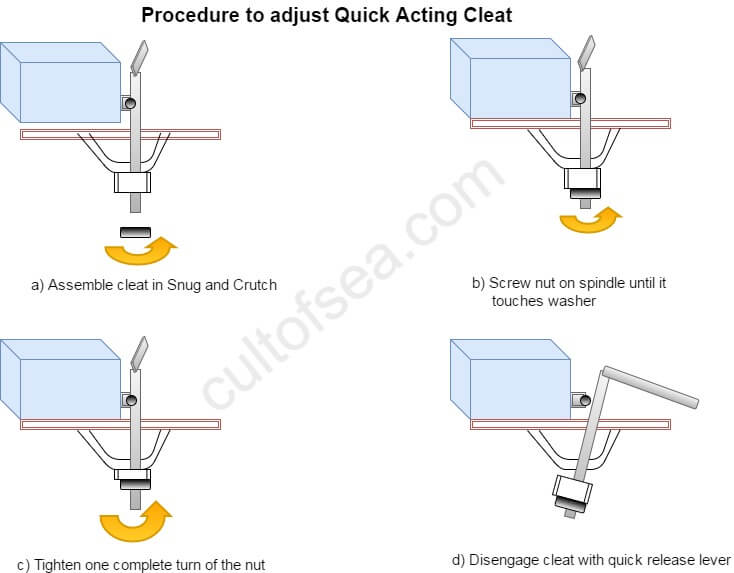
Quick Acting Cleat
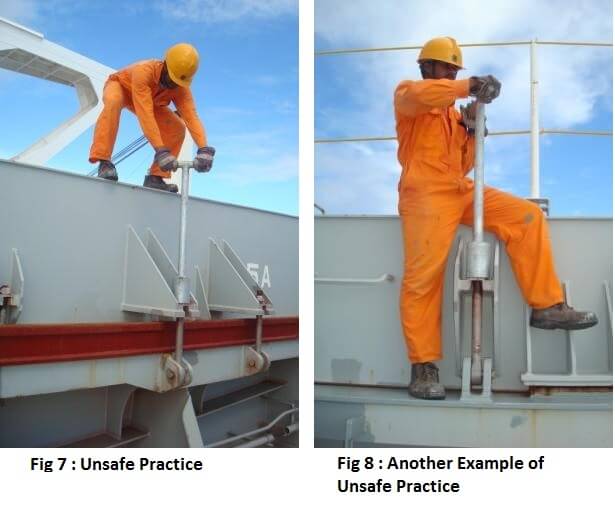
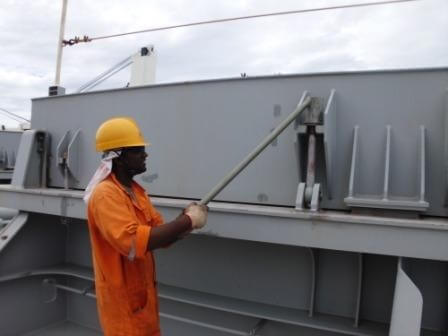
Fig- 9 A Minor modification of the spanner and now its SAFE Practice
HATCH WHEELS
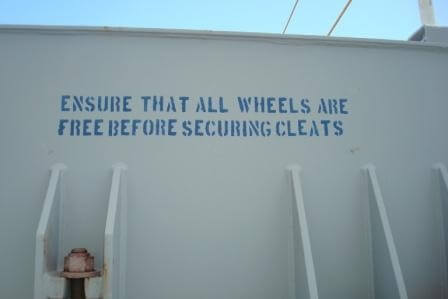
Hatch wheel spindles and bearings need to be greased regularly. Check the wheel spindle for wear and the wheel housing for physical damage. Repair if the spindle is worn or if the wheels are out of alignment. ALWAYS ENSURE THAT WHEN THE HATCH COVER IS HOUSED THE WHEELS ARE FREE TO ROTATE.
Greasing
Wheel spindles , cleat spindles, hinge pins, hydraulic cylinder protective sheaths, cleat wedges, drive chain sprockets , toothed rack and cylinder spherical bearings need to be kept well greased. Regrease every month , and always apply new grease after the ship has passed through heavy weather.
Painting
Corrosion occurs manly where access is difficult, but it can also occur on the underside of the hatch cover, especially along hatch beams. The regular painting will be necessary.
Hydraulic Systems and Components
The cleanliness and viscosity of hydraulic oil must be checked. Samples of the oil should be sent for testing. The hydraulic system is provided with bleed points from which samples can be taken.
Hydraulic oil should be changed every five years or after there have been significant repairs such as piping or cylinder replacement.
Hydraulic oil filters should be changed every twelve months. Ensure repairing of the hydraulic system is done with proper components.
Hatch Cover Motors And Rack And Pinion Drives
Keep the motors and associated control /directional valves well maintained, obtain megger readings as per PMS.
The seals for the hydraulic drive of the sprocket to be kept well clear of dust and cargo residue. The sprocket gear teeth to be well greased at all times.
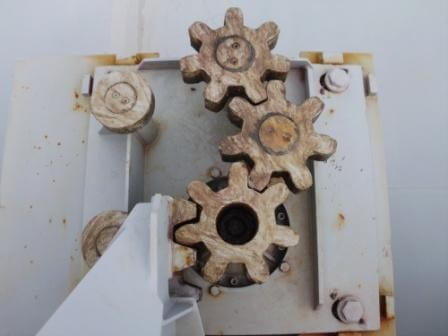
Rack And Pinion Gearing
Hydraulic Jacks And Support
Ensure the seals of the jacks/rams are clean and free of cargo residue especially on completion of cargo operations. Check for pittings on the ram . The hose connections to be well secure and denso taped .
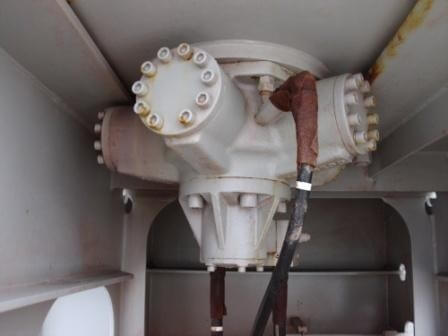
Hydraulic Motor For Rolling In/Out
Ventilator Covers
Ensure packing on ventilators are in good health, treat them as you would treat the hatch cover packings.
Heavy Weather Precaution
The following precautions should be taken if rough or heavy weather or when high swells are expected or when it is likely that water will be shipped on deck.
Prior to Rough Weather
- Check that hatch cleats are properly secured and adjusted . In rough weather , hulls are subjected to high racking forces, so it is essential that hatch covers are held in place but allowed to flex.
- As a precaution , briefly pressurize the hydraulic system to ensure that it is fully charged and that the piping is filled with oil. This has two benefits , first it prevents the possibility of seawater entering loose couplings or seals , and secondly , it eliminates any creep which may have occurred.
After Rough Weather
- Inspect all cleats, guides and hydraulic components for damage . If hydraulic components have been damaged, do not attempt to open the covers . The emergency opening procedure should be followed until the hydraulic components have been checked and tested .
- Check hatch cover for buckling or distortion.
- When opening the hatch covers to check for uneven movement and any unusual noises that may indicate damage.
- Check all grease points and re-grease.
Safety When Working With Hatch Covers
The avoidance and prevention of injuries is of paramount importance. Before working on a hatch, a risk assessment should be completed to identify all hazards . Control and safety procedures should be examined and modified so that hazards are to minimal levels.
The Following Points Should Be Borne In Mind
- Always wear the correct PPE.
- Always test the hold atmosphere before entering:
- Never stand on a moving hatch cover:
- Never stand on a hatch coaming when the hatch is open;
- Never work on a hatch cover when the locking pin or hook is not fitted and secure;
- Never open or close a hatch cover without ensuring the coaming is clear of debris and checking that all personnel are clear of the moving hatch and its channels of wires;
- When opening or closing a hatch never attempt to clear an obstruction with your hands ;
- When hatches are opened at sea always secure them to the coaming top by lowering the wheels into a guide pocket.
Emergency Operation of Hatch Covers
Ensure the emergency pump to operate the hatches are tried out every three months.
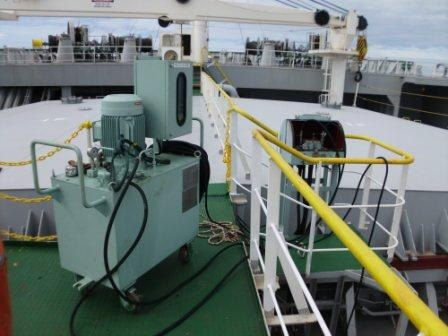
Emergency Hydraulic Pump
Appendix 1- Procedures To Open And Close
Hatch Covers
Prior to opening or closing a hatch, the watch officer should be informed, the hydraulic system should be topped up. Never open or close more than one set of hatch covers at a time.
Opening Procedures
- Ensure v/l is practically upright [List not more than 2-3 degrees].
- Check that the hatch cover stowage area is clear of people, equipment and dunnage;
- Disengage all cleats and heavy bolts and stopper arm is swung out.
- Switch power on and ensure the controls are in neutral;
- Ensure that all personnel are clear of the hatch and is tracking . Position crewmembers to observe both sides of the hatch ;
- Raise hatch covers to the roll position by jacks or by raising the lifting system. The hatch need to clear the hatch guides); ENSURE ALL WHEELS ARE JACKED UP COMPLETELY AND RESTING EVENLY ON THE TRACKWAY [ Else hatch will tend to roll out in crab fashion and misalign and fall off the trackway].
- Start to open the hatch , slowly at first, then at normal operating speed until the hatch is almost open and then reduce to slow speed until fully open. Care must be taken when opening hatch covers especially when the speed of opening can be only partially controlled
- When fully open , secure the hatch with the safety hook or pin before the power is switched off
- Be aware of v/l list/rolling during operation of hatch as unduly high stresses are generated on the side rolling hydraulic motors, and the rack and pinion drives.
Closing Procedures
- Check that the coaming top is clear of cargo or debris.
- Ensure that all the jack supports are on an even plane with the trackway.
- Make sure v/l is practically upright [ not more than 2-3 degrees list]
- Check and confirm that all the cleats and heavy bolts are in the open position and not obstructing the track path of the hatch.
- Check that any damaged wheel tracks, compression bars and landing pads have been repaired. V. IMP: Put grease liberally on the contact pads.
- Ensure that the hold is clear of people and that the access hatches or entrance doors are open. switch the power on and ensure the controls are in neutral;
- Release hatch looking pins or hooks;
- Avoid injuries by ensuring that all personnel are clear of the hatch . Position crewmembers to observe both sides of the hatch;
- Start to close the hatches slowly at first with the speed of closure being gradually increased to the normal operating speed . As the hatch reaches the closed position the speed should be gradually reduced.
- Lower hatch covers into guide pockets using the jacks;
- Finally, check no one is in the hold before closing hold access hatches.
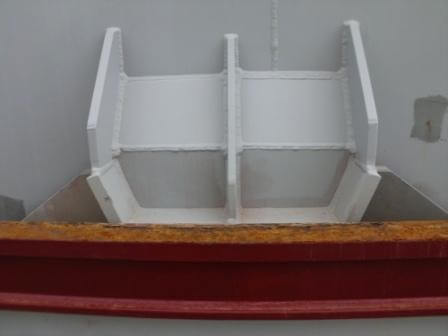
Centering Guide–This Helps Centre The Hatch During Lowering to Housed Position.
Appendix 2 – Hatch Inspection Check Sheet
| MV | DATE | PORT |
HATCH No:
| ITEMS | CONDITION | ACTION |
| Hatch Structure (Outer) | ||
| Hatch Structure (Inner) | ||
| Coaming Structure | ||
| Opening/Closing Mechanism | ||
| Hydraulic Jacks | ||
| Hydraulic Pipes | ||
| Steel–to–Steel- Contact Points [ Landing pads } | ||
| Retaining Hooks | ||
| Wheel Trackway | ||
| Coaming Cleats | ||
| Coaming Compression Bar | ||
| End Stop Pads and Retaining Hook. | ||
| Comments | ||
MASTER CHIEF OFFICER
Appendix 3 – Hatch PMS
| CHECKS AND MAINTENANCE FOR HATCH COVERS | |||
| HATCH COVER NO. : DATE: | |||
| SR. NO. | ITEMS | JOB DESCRIPTION | DONE/ C/O |
| 1 | GENERAL GREASING | USE PNEUMATIC GREASE GUNS | |
| 2 | RUBBER GASKETS | VISUAL INSPECTION, | |
| 3 | GASKET CHANNELS | ENSURE SURFACE SMOOTH ,RUST FREE AND CLEAN PRIOR NEW PACKING INSTALLED . ENSURE LIPS OF CHANNEL ARE ‘ HEALTHY’ | |
| 4 | COMPRESSION BARS | NO RUST, PAINT AND DEFORMATION | |
| 5 | LANDING PADS | TO BE RUST FREE AND ORIGINAL DIMENSIONS MAINTAINED | |
| 6 | HATCH WHEEL TRACKWAYS | TO BE RUST FREE AND WELL COATED | |
| 7 | HATCH COAMINGS [ FOR STRUCTURAL AND COATING BREAKDOWN] | CHECK FOR CRACKS AND DEFORMATION | |
| 8 | HATCH CLEATS | CHECKS FOR PERISHED RUBBER WASHERS | |
| 9 | HATCH WHEELS | WELL GREASED AND WHEN HATCHES CLOSED WHEELS TO TURN FREELY | |
| 10 | END STOPPER AND PADS | CHECK FOR PHYSICAL DAMAGE AND ORIGINAL DIMENSIONS | |
| 11 | HYDRAULIC JACKS | SEALS HOLDING AND NO CGO RESIDUE, NO PITTINGS . HOSE CONDITION | |
| 12 | CONTROL PANNELS | FUNCTION TEST OF ALL PUSH BUTTONS ILLUMINATION LIGHTS, INDICATION LIGHTS AND CONTROL LAMPS OF CONTROL STATION. | |
| 13 | HYD. PUMP UNIT | WORKING PRESSURE AND OIL LEVEL | |
| 14 | HYDRAULIC SPROCKET MOTOR | CHECK FOUNDATION CRACKS, OIL LEAKAGE, SEAL CONDITIONS, MUST BE FREE OF CARGO RESIDUE AND DIRTS, CONTROL VALVES TO BE VISUAL INSPECTED FOR DUST FREE AND ANY ABNORMALITY. | |
| 15 | HATCH SPROCKET (GEAR TEETH) | CHECK FOR ANY DEFORMATION AND WELL GREASED ALL TIME | |
| 16 | VENTILATORS | CHECK FOR ANY LEAK, ANY STRUCTURAL DEFORMATION | |
| 17 | ALARMS | ALL PROVIDED ALARMS TO BE TRIED OUT | |

I am Marlo Longanilla a License Chief Engineer and works on board commercial vessel who wants to explore more concerning Hatch cover which installed to a cape size vessel where the wheel / hatch cover where lifted by means of electric power motor
Thanks Very Much
Exelent
Thanks Very Much FOR FORMATION
Details and clear. Thank you very much.
Great insights on hatch covers! The detailed section on inspection and maintenance practices was particularly helpful. I appreciate the emphasis on safety precautions—definitely a crucial aspect that can’t be overlooked. Looking forward to more posts like this!
Great insights on hatch covers! It’s crucial to understand their function and the importance of regular inspections. The maintenance tips provided are particularly helpful for ensuring safety and efficiency during operations. I appreciate how you highlighted the various tests necessary to keep everything in check. Thanks for the informative post!
Great insights on hatch covers! It’s crucial to understand their function and maintenance for safety at sea. I appreciate the detailed section on inspection procedures; it’s often overlooked but so important. Looking forward to more posts like this!
Great insights on hatch covers! I appreciate the detailed breakdown of their function and the emphasis on inspection and maintenance. It’s crucial for safety and efficiency in operations. Looking forward to applying these tips in practice!
Great post! It’s crucial to understand the importance of proper hatch cover maintenance and inspections to ensure safety and efficiency on board. The detailed overview of tests and precautions is very helpful for both new and experienced crew members. Keep up the good work!
Great insights on hatch covers! I appreciate the detailed breakdown of their functions and the emphasis on inspection and maintenance. It’s crucial for safety at sea. Looking forward to implementing some of these precautions in our operations!
Great insights on hatch covers! I appreciate the detailed breakdown of their function and the importance of regular inspection and maintenance. It’s crucial for safety and efficiency. Looking forward to implementing some of the precautions mentioned!
Great insights on hatch cover maintenance! It’s crucial to understand the importance of regular inspections and tests to ensure safety at sea. I appreciated the detailed precautions mentioned as well—it’s easy to overlook these when in a hurry. Looking forward to more posts like this!
Great insights on hatch covers! It’s crucial to emphasize regular inspections to ensure safety and efficiency. I appreciated the detailed information on maintenance practices; it really highlights how important these components are for overall vessel integrity. Thanks for the informative post!
Great insights on hatch covers! I appreciated the detailed breakdown of inspection procedures and maintenance tips. It’s crucial for ensuring safety and efficiency on board. Looking forward to more posts like this!
Great post! I found the section on inspection and maintenance particularly insightful. It’s crucial to ensure hatch covers are in top condition for safety and efficiency. Thanks for providing such detailed information!